
Developmental & Orthodontic Treatment with Palatal Expanders
Sometimes our Detail Dental Kids dentists see patients who exhibit signs of dental crowding, misalignment of the teeth known as a crossbite, a narrow palate or even impacted teeth which are blocked from proper eruption through the gumline. These symptoms may even cause the patient to suffer from sleep disordered or difficulty breathing. In some of these cases an orthodontic device called a palatal expander may be prescribed to “expand” the upper jaw by applying light pressure to the upper molars during daily adjustments or activations. This increases the size of the bone to accommodate all the permanent teeth and to correct misalignments between the upper and lower jaws so that the top and bottom teeth line up properly. A palate expander can also assist in achieving a wider, more aesthetically pleasing smile in addition to addressing functional problems like restricted airways.
Why is my child being recommended for Palatal Expansion?
The age range for introduction of palatal expander therapy may vary, however younger children whose jaw bones are still forming and growing are the best candidates for palatal expanders. Because growing bones are impressionable and more receptive to treatment, expanding the palate with an expander is best done when the jaw bones are still developing. Adults may also benefit from palatal expanders, but because the jaw bones have already stabilized, they will likely require additional surgery before undergoing palatal expansion.
How does a a palate expander work?
Orthodontic expanders come in a variety of designs, but they all function generally the same way. A rapid palatal expander is a custom stainless-steel appliance made of pivot points, arms and affixed bands that wrap around the upper molars and abut the adjacent teeth. At its center, the two parts of an expander are attached to one another by a center screw. Once fitted in place, the expander is activated by turning the screw using an expander key. This key turn applies gentle pressure on the upper teeth and palate causing the bones in the upper jaw to gradually widen over the course of a prescribed treatment schedule.
At home instructions for your palatal expander:
Once expansion treatment is complete, your child will wear their appliance for several months to ensure expansion is set and prevent relapse.
Parents can rest easy as there is no pain associated with the palatal expander during treatment. Neither the placement of the palatal expander nor its activation will hurt or harm your child. At most, they might feel tingling around their teeth and on the bridge of their nose each time the key is turned to activate the palatal expander. This is a common side effect of palatal expanders and will quickly pass. It is also typical to experience some minor discomfort the first week after placement of the palatal expander as the teeth are still getting used to the new appliance. This should last only a week or so. Other side affects of placement may be difficulty in speaking and chewing. This too passes quickly, with speech and eating returning to normal in just a few days.
What you should look out for:
During treatment, children should avoid sticky and hard foods which could get lodged in the expander. Should some foods become lodged, it is recommended that parents supervise younger children as they clean their expander with warm water and a toothbrush. If food particles persist or disrupt the expander key, parents can use a toothpick to gently remove particles to continue treatment. It is recommended patients or parents never use anything harder than a toothpick or soft dental pic to dislodge food particles from a palatal expander to avoid damage to the appliance resulting in a delay in treatment.
Palatal expansion activation steps:
Our Detail Dental Kids team will instruct you on how often to activate the palatal expander based on your child’s unique situation and condition, and to keep them on track with their orthodontic program.
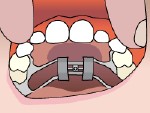 Step1: In a well-it room, tilt patient’s head back to get a good view of the device.
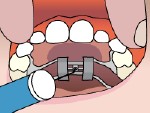 Step 2: Place the provided key firmly into the keyhole. Note: there is a bend in the keyhole to prevent you from pressing in too far and poking the patient.
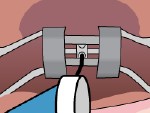 Step 3: Gently, but firmly push the key toward the back of the mouth, rotating the expander wheel to expose a new hole for the next prescribed treatment. The rotation is complete when the key meets the back of the expander.
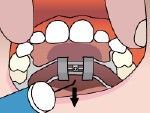 Step 4: Push back and down toward the tongue to remove the key.
 6820 Parkdale Pl., #117 |